
|
Sergey Ivanov,
|
Akesson, Ralf (2495) - Ivanov, Sergey (2545)
Stockholm, 2000, round 7
[D45]
|
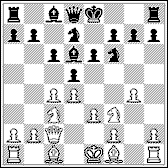
The game took place at round 7. By that time I had scored 5.5 points and was half a point ahead of my partner. Akesson is known as an uncompromise player, and I myself is ready to add fuel to the fire, so one could expect a hot battle. That was what happened. 1. d4 d5 2. c4 e6 3. Nc3 c6 4. e3 Nf6 5. Nf3 Nbd7 6. Qc2 Bd6 7. g4
White shows his aggressive designs from the very beginning. Akesson had never used this lunge, so to some extent it became a surprise for me, but, frankly speaking, rather pleasant one. Let me a little digression to explain to my readers what these feelings are bound up with. I studied chess at the Leningrad Pioneers' Palace (subscribers of the "New in Chess" Magazine could feel its atmosphere with the help of the remarkable essay of Genna Sosonko, dedicated to Vladimir Zak ["A great teacher inspires" - see NIC 99/5]). A very experienced master Sergey Khavsky was my coach (by the way, a well-known St.Petersburg grandmaster Vladimir Epishin, living now in Germany, was one of his students). Well, master Khavsky inculcated us steadfast disgust for moves like g2-g4 and g7-g5 , especially when one makes them at the open position or having a king unprovided for. He often said that "the only case to play g2-g4 is when you win at least a piece". We even invented a special term for such a move - "the anti-Khavsky move". Accordingly, when an opponent resorts to the move, I feel an insuperable desire to "punish" him for this untimely activity and permanently tell myself that "a pawn doesn't advance back" and that "the position weakening must adversaly affect early or late". 7...Bb4In my opinion, it's one of the effective ways to oppose to the White's offensive, along with 7...Nxg4 8. Rg1 f5 . Black moves a bishop two times in a row, but provides a knight for a firm outpost e4 in return. 8. a3!?A seldom but rather venemous plan. Usually White plays 8. Bd2 . I had already had a quite good experience at this line: 8...Qe7 9. g5 Bxc3 10. Bxc3 Ne4 11. Bd3 Nxc3 12. Qxc3
12...dxc4! 13. Bxc4 b6 14. O-O-O Bb7 15. Ne5 Nxe5 16. dxe5 O-O 17. f4 c5 18. Rhf1 Rfd8 , and Black has not a shadow of difficulties, D.Shchukin - S.Ivanov, St.Petersburg 1998. 8...Bxc3+ 9. bxc3
Erroneous is
9. Qxc3? Nxg4 10. Rg1 Ngf6
, and
11. Rxg7??
loses
after
11...Ne4 12. Qc2 Qf6
Black develops his bishop to the big diagonal, where it certainly would have
what to do. After
9...Nxg4 10. Rg1 h5 11. h3 Nh6
or
9...e5 10. Rg1
e4 11. Nd2 Qc7
(
11...O-O 12. a4
Also tested was
10. cxd5 cxd5 11. Bb5 O-O 12. Bd3 Bb7 13. Bb2 Rc8
14. h4
White managed to unload the big diagonal and at the same time to check the important square e4 . In the case of straightforward 11. g5 Ne4 12. Bd3 I intended to play 12...Qc7!?
with the idea
13. Bxe4 dxe4 14. Qxe4 c5 15. d5
(
15. Qg4 cxd4
16. cxd4 Qxc4
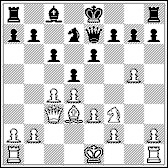
Now the pawn structure at the center takes shape. Deserving attention was more flexible 11...Qc7!? 12. g5 Ng8 13. h3 Ne7 , keeping the possibility to play on either side. 12. cxd5Worse is 12. g5 Ne4 13. Nxe4 dxe4 14. h4
14...h6!? 15. gxh6 g6! , and Black re-takes initiative. 12...exd5 13. g5 Ne4 14. Nxe4 dxe4 15. Bb2
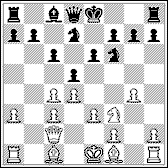
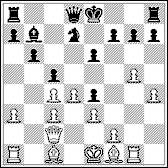
Had a pawn stayed on g2 instead of g5 , the advantage of White would have been incontestable, for he has two bishops and a solid center. But now the weakening of the White's kingside gives Black objects for counterplay. That moment I thought kindly of master Khavsky once more. 15...cxd4I believed that the opening of the line c was in my favor, for the white king remained at the center. I didn't like 15...O-O because of 16. c4! cxd4 17. Bxd4 , and the White's dark-square bishop becomes too active. Probably, it was worth to consider 15...Qc7 with the purpose to evacuate the king to the queenside. 16. cxd4After 16. exd4 Qc7 17. Rg3 O-O 18. c4 f5!? 19. gxf6 Nxf6 a double-edged position appears, where either of partners has his own trumps. 16...O-OIf I had imagined what the next move would be I would have preferred 16...Bd5 , safely blocking the pawn d .

A bolt from the blue! I had examined only 17. Bc4 b5! , 17. Rd1 Bd5 or 17. Qb3 Rc8 with counterplay in any case. 17...Re8I refused 17...Bxd5 without thinking a bit: it's obvious at first sight that dominating over almost all open files and diagonals, White easily forces the opponent's defence. In my opinion, the most spectacular way is the following: 18. Rd1 Rc8 19. Qa4
19...Rc5
(
19...Bc6 20. Qd4 f6 21. gxf6 Rxf6 22. Bh3
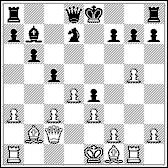
If 18. Qc3 , then 18...Ne5 ; in the case of 18. Bb5 Rc8 19. Qa4 Ne5 20. Bxe8 Nd3+ 21. Kf1 Qxe8 Black has more than a sufficient compensation for an exchange. 18...a6White plans to transfer the queen at the center, to the square d4 , through d2 or a4 , and Black can't prevent it. My last move is connected with the preparation of the advance b6-b5 with the purpose to open a way out to the queen and to take the important square c4 under control (immediate 18...b5 was impossible because of 19. Bxb5 Qa5+ 20. Qc3 ). But this plan proves to be somewhat sluggish. It was worth to choose 18...Rc8 19. Qa4 Ne5 20. Qxe4 Nc4 , and if White sacrifices the queen - 21. Qxc4 Rxc4 22. Bxc4 , then Black has a retort 22...Qc7 leading to unclear play. 19. Qa4
19. Bh3
(threatening
20. Bxd7
and
21. Qc3
) is met by
19...Rc8 20. Qd2
(
20. Qa4?! b5 21. Qd4 Ne5 22. Qxe4 Rc4
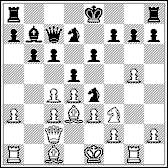
20...Rc4! (control over the square d4 !) 21. Bxd7 Qxd7 22. Ba1 Qb5 (control over the square b2 !), and Black's chances seem to be better. 19...b5 20. Qd4 Ne5 21. Be2 Rc8
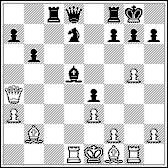
Both sides has fully completed development. The very next moves are to show whose trumps are more significant. 22. Qxe4
Leads to simplifications and lightens Black's play. During the game I feared
22. d6
, for after natural
22...Qd7
(
22...Rc2 23. d7 Re6
[
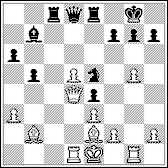
23...Re7 24. Qb6!
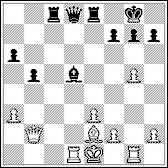
Judging by my partner's reaction, he had evidently underestimated this simple capture. A bishop boldly stands under the pin, but the open location of the king doesn't let White to derive profits from it.
In search of a slipping advantage White goes too far. Also erroneous is
25. Bf3? Qa5+ 26. Ke2 Bc4+
Thanks to the pawn
g5
Black makes both ends meet once more -
26. Qd4
replies with more than convincing
26...Qh3+ 27. Ke1 Qh2
This is lost. After 26. Rg3 White would have kept a defendable position, although it would have been Black who possesses doubtless initiative. 26...Bc4+ 27. Ke1
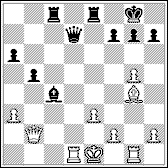
In the case of 27...Qa7 possible is sharp 28. Bxc8 Rxe3+ 29. Kd2 Re2+ 30. Kc1 Qc7 31. Rd2 , as well as quiet 28. Qd4 . 28. Bxc8 Qxh2 29. Rg4
29. Rg3
would have prolonged White's resistance, but would have hardly
let him to escape:
29...Qh1+
(unclear is
29...Rxc8 30. Qc2
)
30. Kd2 Rd8+ 31. Qd4 Rxd4+ 32. exd4 Qd5
White can't protect his king from co-ordinate attack of all black pieces. In addition, Akesson was in a terrible time trouble. 30. Rc1
Neither
30. Rf4 Qg1+ 31. Kd2 Rd8+ 32. Rd4 Qxf2+ 33. Kc1 Qxe3+
 32. Rcxc4 bxc4 33. Rf4 Rd8+
34. Rd4 Qxf2+ 35. Kd1 Qg1+ 36. Kc2 Qg2+ 37. Kd1 Qxg5
Mate in several moves is inevitable. |
 , E.Agrest)
12. g5 Ng8 13. f4 Ne7
the position is more sharp.
, E.Agrest)
12. g5 Ng8 13. f4 Ne7
the position is more sharp.
 , S.Kitte -
J.Mewes, Germany, 1996.
, S.Kitte -
J.Mewes, Germany, 1996.
 )
15...O-O-O
)
15...O-O-O
 (or even
15...b5!?
)
(or even
15...b5!?
)

 )
20. Bh3 f5
21. gxf6 Nxf6 22. Qxa7 g6
(
22...Rf7 23. Be6!
)
20. Bh3 f5
21. gxf6 Nxf6 22. Qxa7 g6
(
22...Rf7 23. Be6!

 ;
22...Rc4 23. Qa7!
;
22...Rc4 23. Qa7!
 ) White strikes the
unexpected blow -
23. Bg4! Qxg4! 24. Rxg4 Nf3+ 25. Kf1 Nxd4 26. d7! Nf3
27. Kg2
, and Black hasn't a sufficient compensation for an exchange.
) White strikes the
unexpected blow -
23. Bg4! Qxg4! 24. Rxg4 Nf3+ 25. Kf1 Nxd4 26. d7! Nf3
27. Kg2
, and Black hasn't a sufficient compensation for an exchange.


|
|
Previous game, annotated by S.Ivanov |