
|
Sergey Ivanov,
|
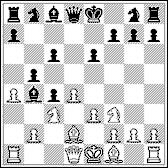
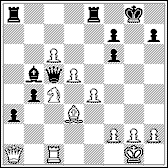
Ivanov, Sergey (2550) - Solovjov, Sergey (2445)
St.Petersburg Men Championship, 1999
[D31]
|
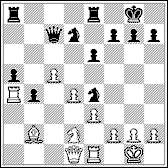
1. d4 d5 2. c4 c6 3. Nf3 e6 4. Nc3 dxc4 5. a4 Bb4 6. e3 b5 7. Bd2
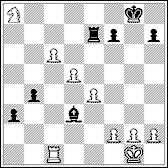
The double-edged Noteboom system becomes very popular nowadays. Just one
example:
7...Qe7 8. axb5 Bxc3 9. Bxc3 cxb5 10. d5 Nf6 11. dxe6
(
11. d6 Qb7 12. b3
13. Qf3 Ne4 14. g4
(
14. Nf5!?
)
14...
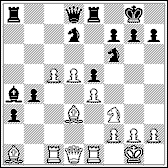
Another popular line - 11. d5 Nf6 12. bxc4 b4 13. Bxf6 Qxf6 14. Qa4+ Nd7 15. Nd4
15...e5
(
15...Ke7 16. d6+ Kxd6 17. Rd1 Kc7!?
This variation is of the most frequently use. There are 31 games in Chess Assistant 4.0 on it, played mainly in 1997-98. A detailed survey of this variant is given at the "Chess St.Petersburg", N 2(8)/1998. 15...Qc7 is considered to be less accurate because of 16. e4 e5 17. c5! exd4 18. Rc1! , and the black queen's position on c7 is not good. It lets White to take initiative.
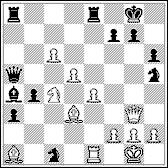
This is a new plan. Not without reasons, White believes that his central pawns, if advance, will be more dangerous than the queensude's black passed pawns. Immediate 16. e4 doesn't seem to be well prepared: 16...e5 17. c5 exd4 18. Rc1 Bxe4 19. c6 Nf8!? , and White has to prove that his activity costs a pawn. Usually White tries 16. c5 . One of the latest examples: 16...Bc6 17. Bc2 Ne4 18. Ba4 Qc7 19. Nd2 Bxa4 20. Rxa4
20...Ndxc5! 21. dxc5 Rad8 22. Bd4 Nxd2 23. Qxd2 e5
This is the most reliable reply to the White's idea. Black takes the
opportunity to advance his pawns further to bind the opponent's pieces. The
possibility
16...e5
is standard too. Possible is
17. Nxe5
(interesting is also
17. dxe5
or
17. Bf5
)
17...Nxe5 18. dxe5
Nd7 19. e6!?
(
19. c5 Nxe5! 20. Bxe5 Rxe5
Now erroneous is
20. Qh5?! Nf6 21. Bxf6 Qxd3 22. Qg5
(
22. Bxg7 Kxg7
23. Rcd1 Qg6 24. Rd7+ Kg8 25. Qxg6+ hxg6 26. Rxb7 Reb8
In the case of
18...Bc6
White has a pleasant choice between
19. e5
Nh5
(unfortunately, the square
e8
is not free)
20. Nd2 Nf4
21. Be4 Bxe4 22. Nxe4
with the subsequent
Nd6
19...Rc8?
is bad because of
20. dxe5
(
20. Qa4!?
)
20...Ng4 21. Bb5 Bc6 22. Bxc6 Rxc6 23. Qd4!
20. dxe5 Ng4 is quite good for Black. 20...Ba4
Bad was
21. Bc2 Nxc5 22. Bxa4 Nxa4 23. Nxe5
(
23. Qb3 Nc3
A)
21...Qa5 22. c6 Nc5 23. Bxe5
(worse is
23. Nxe5 Nb3
24. Rb1 Nxa1 25. Nc4 Qd8! 26. Rxa1 Nd5
) the white queen doesn't find
itsself under the fork and after
23...Nxd3
(
23...b3 24. Bc3
B)
21...Ra5 22. c6 Nc5
, and in the case of
23. Bxe5
(
23. Rb1!?
Of course, bad is
21...b3? 22. c6 b2
(
22...Nf8 23. Bxe5 b2
24. Rc3
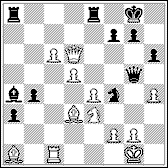
White can't prevent black knight to occupy the square c5 : 22. Qe3 Ng4! 23. Qg5 Nxc5 24. Rxc5 Qxc5 25. Qxg4 f6 with a very dangerous threat of b4-b3-b2 . 22...Nc5 23. Nxe5
Deserving attention was
23. Bxe5!? Nb3 24. Qg5 h6 25. Qg3 Nh5 26. Qg4 Nxc1
27. Rxc1
I had been thinking for 45 minutes here, but, nevertheless, didn't bring
myself to
24. Qg5
. May be, computer analyses will allow to prove that
White would have lost in this case too. But at the practical game this
aggressive move was apparently the best solution. The game could develop like
this:
24...h6 25. Qg3
(
25. Qf5!?
)
25...Nxc1
(if
25...Nxa1
, then
26. Rxa1 Nh5 27. Nc4
or
26. Nc4
is
possible)
26. Nc4
(it seems that strong is
26. Nd7 Nh5 27. Nf6+
Nxf6 28. Bxf6 g6 29. Rxc1
with attack, but a counterattack exists:
26...b3! 27. Nxf6+ Kh8 28. Rxc1 b2 29. Qe3 bxa1=Q 30. Rxa1 Qc3
A)
27. Nxa5 Nxg3 28. Rxc1 Nxe4
B)
27. Qe3 Nxd3
(
27...Qxd5!?
)
28. Nxa5 Nxe1
29. Qxe1 Rxa5
C)
27. Qd6!? Qd8!?
(
27...Nxd3 28. Nxa5 Nxe1
29. Qxb4
30...Nh3!+
(
30...Qxh4 31. g3 Nh3+ 32. Kg2 Qh5 33. Rh1
There was another way for White: 24. Qe3 .
A)
24...Nxc1 25. Rxc1 b3 26. Nc4 Qb4
(
26...Nxd5?
27. Qg5!
B)
24...Nxa1 25. Nc4 Qd8 26. Rxa1 Nxd5
Black has to prevent the white bishop to consolidate on the square
d4
.
Dubious was
25...Qc7?! 26. d6! Qxd6 27. Nxf7
(
27. Qxf7+ Kh8 28. Qb7
Bb3
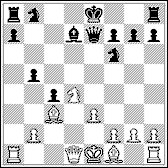
26. d6 is refuted by 26...b3! 27. Qxa3 Bxc6 . 26...Qc5 27. Bxf6This exchange was necessary - otherwise White couldn't defence the pawn e4 . 27...gxf6 28. Qa1 Bb5Black was threatened with 29. Nxa3 and the unpleasant transfer of the knight c4 to the f5 through the e3 .
I refused 29. Ne3 because of 29...Qxc1 30. Qxc1 Bxd3 . On the face of it, black pawns can't be stopped. But it turns out that after 31. Ng4! the white queen and the knight cooperate perfectly and produce dangerous threats to the black king. For example:
A)
31...b3? 32. Nf6+ Kh8
(
32...Kf8 33. d6 Kg7 34. Qg5+
Kh8 35. Nh5
)
33. Qh6 Bxe4 34. Nh5 Rg8 35. Qf6+
B)
31...a2 32. Nf6+ Kh8 33. Qa1 Re7 34. d6
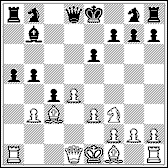
After the brown study my opponent decides to continue the struggle, and he didn't make the mistake as I did. He had only a draw after 29...Bxc4 30. Qg5+ Kf8 31. Qh6+ Ke7 32. Qg5+ , and Black can't avoid a perpetual check. 30. Qxe7
White would have had more practical chances after
30. Qh6
In the case of 31. Nb6 black has several ways to the win: 31...Bxd3 (possible is 31...b3 32. Nxa8 b2 33. Rd1 a2 ) 32. Nxa8 .
A)
32...Ra7 33. c7
(
33. d6 Rxa8 34. d7 Bb5
B)
32...b3 33. d6 b2 34. Rd1 Kf8! 35. d7
(
35. dxe7+
Kxe7 36. c7 Ba6
The rook must attack passed pawns. If
31...Rea7
, then White could gain
good chances to a draw by sudden
32. Nxa3!
(
32. c7 a2 33. Ra1
b3
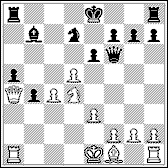
After 32. Nxa3 Bxc6 the pawn d6 is undefendable. 32. Nb6 Bxc6 33. Nxa8 Rxd6 also didn't help. 32...a2
Of course, impossible was
32...Bxc4?? 33. d7!
The decisive mistake. Losing was also
33. e5 a1=Q 34. c8=Q+ Rxc8 35. Rxa1
Bxc4 36. Bxc4 Rxe5
. White had to play
33. Nb6!? Rxd6
(
33...a1=Q
34. c8=Q+ Rxc8 35. Rxa1
White couldn't longer escape: 34. e5 Bxc4 35. d7 Ree8 36. dxe8=Q+ Rxe8 37. Bxc4 b2 . 34...Rxd6The easiest way. 35. Bxb5 Rd2
|
 )
11...Bxe6 12. Nd4 Bd7
)
11...Bxe6 12. Nd4 Bd7
 , Alander -
V.Bagirov, Berlin, 1998.
, Alander -
V.Bagirov, Berlin, 1998.
 )
16. Nb3 Ke7 17. Be2
(
17. Qb5 Ba6 18. Qxa5 Rhb8 19. d6+ Ke8!
)
16. Nb3 Ke7 17. Be2
(
17. Qb5 Ba6 18. Qxa5 Rhb8 19. d6+ Ke8!
 )
17...Rhc8
- hasn't still gained a
certain estimation.
)
17...Rhc8
- hasn't still gained a
certain estimation.

 21. c6? Bxc6! 22. Rxc6 Rd5

 )
22...Qg6
23. Qxg6 hxg6 24. Be5 a4
, and White gained a hard ending, S.Ivanov -
V.Malakhov, Cappelle la Grande, 1999. But
20. c5 Bc6
(
20...Rc8
21. Bb5 Bc6 22. Qa4!?
)
22...Qg6
23. Qxg6 hxg6 24. Be5 a4
, and White gained a hard ending, S.Ivanov -
V.Malakhov, Cappelle la Grande, 1999. But
20. c5 Bc6
(
20...Rc8
21. Bb5 Bc6 22. Qa4!?
 ) is
stronger:
21. Rc4 e5
(
21...Nf6 22. Rd4 Qc7 23. Rd6
)
22. Qc2
Nf6 23. Rh4 e4 24. Bc4 Kh8 25. Rd1 Qe7 26. Rd6
) is
stronger:
21. Rc4 e5
(
21...Nf6 22. Rd4 Qc7 23. Rd6
)
22. Qc2
Nf6 23. Rh4 e4 24. Bc4 Kh8 25. Rd1 Qe7 26. Rd6

 and
19. Bc2
b3
(
19...e5? 20. d5 Bb7 21. Qd2 Qa5 22. Rb1
and
19. Bc2
b3
(
19...e5? 20. d5 Bb7 21. Qd2 Qa5 22. Rb1
 )
20. Bxb3 Bxe4
21. Ne5
)
20. Bxb3 Bxe4
21. Ne5
 )
23. cxd7 Qxd7 24. Bxb2 axb2 25. Qxb2
)
23. cxd7 Qxd7 24. Bxb2 axb2 25. Qxb2


|
|
Next game, annotated by S.Ivanov |
|
|
Previous game, annotated by S.Ivanov |